How to Create Custom Audio Tones on your Symbol DS4800
October 13, 2014

Did you know the DS4800 can play customizable audio tones when you scan a barcode? Yeah, no kidding, it can do that. I was told this from product launch, but I was never able to figure it out. Then the newest version of 123Scan added a curious “Custom Scan Tone 6” selection to the DS4800’s list of tones. But I couldn’t find a way to get the data onto the scanner, until yesterday.
In its current incarnation, it requires quite a few steps, and a lot of trial and error, but hopefully I’ve cleared most of that up so you can have an easier time getting whatever you want onto your DS4800. I’ve been told it’ll eventually be incorporated into 123Scan, but in the meantime it takes a few extra steps.
Ingredients
So this turned into a recipe rather quick, seems like a fun way to explain it all. Anyway, these are the PDFs and applications you’ll need to customize your DS4800:
DS4800 Product Reference Guide – It’s 478 pages, it talks about everything from optimal viewing angles to setting the scanner up to support traditional Korean keysets.
DS4800 PRG Appendix J – This is the section of the Product Reference Guide that covers setting custom tones.
Motorola Scanner SDK – This is the software you use to upload audio tones to the scanner. It has a ton of other really cool stuff too, like a way to test image capture or scale output. If you’re providing support for customers with Motorola or Symbol scanners, this should be in your toolset.
Motorola Scanner SDK For Windows Developer’s Guide – At 142 pages, it’s a bit big, but it does have error code descriptions and general tips for using the software. It’s not fully necessary, but it’s good to have in case something weird happens.
An Audio Editor – I’m using Audacity because it’s free and is pretty easy to set up. But if you have an audio editor in mind that can set sampling rates, bitrates, and can export as WAV, that works too.
I’d recommend installing the apps prior to getting started. The Motorola Scanner SDK requires additional software, so there may be a couple reboots before it’s ready to go. Audacity might require additional software to be installed prior as well. But once they’re installed, we can begin.
Audio File Prep
(I’ve created the walkthrough for Audacity. If you have your own software, your mileage may vary.)
The DS4800 has very specific requirements for audio files:
- WAV file format
- 16 kHz sampling rate
- 16-bit audio
- Under 128 KB
If there’s even mild deviation from these settings, the file won’t upload. Thankfully, it won’t break the scanner either. I’d recommend making a few, you never know if you’ll want to hear the Pac Man noise with every scan in perpetuity, or if you’d prefer the coin noise from Super Mario Brothers. Or Angie from 30 Rock saying Ham. She says it really well. Regardless of the file, you’re going to need something that is about 1 second long, otherwise it’ll be too large, even when downsampled.
Once the audio clip is trimmed to your liking, you’ll need to prep it for import, which is a few extra steps.

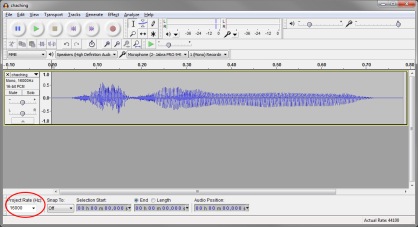
The first is to change the sample format to 16-bit. This is located on the audio wave form, next to the file name. You expand that menu and choose “Set Sample Format” then “16-Bit PCM”.
Next, go to the track menu and select “Resample”, then set the new sample rate to 16000 Hz.
Finally, change the “Project Rate (Hz)” at the bottom left of the screen to 16000 as well.

Now whatever you export should be ready to go onto the DS4800. From the file menu, choose Export Audio, and save it to a location on your computer. The filetype should default to “WAV (Microsoft) signed 16 bit PCM.”
Scanner Prep
So you have your files, and probably a big grin on your face, because who doesn’t want their scanner to shout IGNORE ME after every scan? Now to get those files onto the DS4800.
The first thing is to set your scanner to Symbol Native API (SNAPI) with Imaging Interface. This allows the scanner SDK to connect to it and send files back and forth. It’s also as easy as scanning this barcode right here:

You can also find it in the Product Reference Guide in section 3-5 (Page 37).
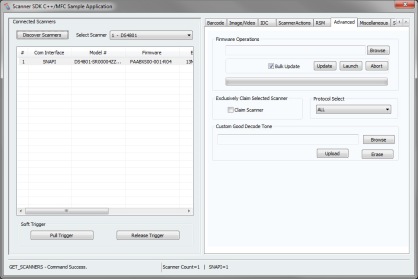
Now that it’s switched, unplug the scanner and start up the “Motorola Scanner SDK C++ Sample Application.” That’s a hell of a name. It’s located in your start menu, so Start->Motorola Scanner->Scanner SDK->C++ Sample Application.
Plug the scanner back in, and once it’s started up and ready, it will be identified in the software after clicking the “Discover Scanners” button in the upper left.

Next, click the Advanced tab. At the bottom of that tab is a section, “Custom Good Decode Tone,” that’s where you can upload the file. Click browse, navigate to the file and click Open. Then click upload. At this point you’ll see a status message at the bottom left of the screen:
UPDATE_DECODE_TONE – Command Success – This means you now have your very own custom tone on your DS4800.
With the audio file added to the scanner, it’s time to test it out. Scan the “Scan Tone 6” configuration barcode, either from the PRG, the Appendix, or this picture right here:

And now test it out! Scan some barcodes! It’ll be so novel!
Troubleshooting
I ran into more than a few issues while setting this up, primarily having to do with the filesize and precise formatting of the audio files. Since this product is so new, there isn’t a lot of documentation available for it. If you try to upload an incompatible audio file, the SDK will display some error codes. I’ve listed what the Motorola Scanner SDK For Windows Developer’s Guide describes the error as, along with what I assume is going on.
UPDATE_DECODE_TONE – Command Failed. Error:107 – Invalid Argument – This one only happened for me when I tried uploading files from a network location and not something directly stored on my computer.
UPDATE_DECODE_TONE – Command Failed. Error:117 – Operation Failed In Device – This means the audio file is not exactly what the scanner is expecting, so maybe the bitrate is off, or the Hz, or something else.
Update 10-16-2014: It also means the firmware is not new enough to support custom audio tones.
UPDATE_DECODE_TONE – Command Failed. Error:308 – Arguments in inXML are not Valid – I don’t know what this one meant, it was sort of a variation on Error 117 I guess. It happened on a couple files that were too large, but also happened on some that were over 60 Kbyte but less than 128 Kbyte.
These issues shouldn’t crop up if you follow the steps up above. If they do, please shoot me a comment or an email or maybe send a carrier pigeon my way with your question.
October 29, 2014 at 3:51 pm
[…] remember the other day how I put up instructions on how to set a custom beep on your DS4800? Well I thought it’d be good to get some documented proof of it using a custom tone. Yes I […]